100% on Professional Scrum Master 1 (PSM 1) Certification Exam

I took the Professional Scrum Master 1 (PSM 1) certification exam today. I passed with a score of 100%. I will briefly share how I prepared for the test.

How I Prepared

I have experience using Scrum as a product manager. That proved to be helpful in understanding how to practically apply Scrum. I experienced many of the situations where a question includes a Product Manager.

I read through chapters 1 to 17 of Agile Project Management for Dummies on my Kindle. I found it helpful to understand broad concepts. It probably is more than what is needed for the certification test. Yet I felt very comfortable reading the Scrum guide and sample test questions after reading this book.

I read through some forum posts. This post (https://www.scrum.org/forum/scrum-forum/6156/psm-i-passed-100) was written by another person who passed with 100%. This post (https://www.scrum.org/forum/scrum-forum/7708/passed-psm-i-975-experiences) is more recent and the person passed with 97.5%.

I did the Scrum Open Assessment test about eight times. Several exam questions are similar to what I saw in other practice exams.

I did several practice exams on https://www.techagilist.com/practice-exams/psm-i-practice-test/psm-practice-exam-real-mode-questions/. These seem to be very popular and match what is in the Scrum Open Assessment test.

I spent US$9.99 for one week of access to  the Scrum Master Certification practice exam at https://www.capeprojectmanagement.com/agile-exams/. These are provided by Cape Project Management, Inc. I tried about eight sets of eighty question practice exams. The questions are similar to what I saw in other practice exams. There is similarity between questions in each practice exam. However, I liked the questions and I think that they helped me pass.

I read the Scrum Guide about 12 times. I would take one or two practice tests and then read through the Scrum Guide. This process helped me find the answers to practice questions that I got wrong. I kept doing this until I felt that I could answer correctly and explain why the other answers were wrong.

I read through the exam tips on https://www.volkerdon.com/pages/psm-1-exam-tips. I took the sample exam, too. I read through parts of the available course material. I thought that the course material was good; but I had a good understanding of the Scrum framework by the time I came to this website. It is probably a good idea to read through their course material if you have not read anything else but the Scrum Guide.

The Test

I had some concerns that the real exam would be more difficult than the practice exams. These concerns were based on some forum posts that I read. However, I thought that the actual exam was similar to what I had seen on practice exams; but not identical. I think that this is because I had worked through about 25 full practice exams. I also had experience, read a book on Agile, and read through the Scrum Guide many times.

I could answer most questions quickly. I returned to review a small number of questions. I changed answers on three questions after reading through them carefully again.

Recommendations

I agree with the forum posts that I read. However, I recommend that you take a couple of practice exams and then read the Scrum Guide. Repeat this process several times. Read a book on Scrum and/or Agile if you don’t have experience or knowledge.

Good luck when you take the PSM 1 test!

Agile Enterprise Architecture

I have spent the past few months thinking about why I would want to implement a complex and detailed enterprise architecture framework. I’ve always been an agile thinker. How can I rapidly implement a digital transformation using an enterprise architecture framework? Thus, I did some research and thinking. Below are my summarized thoughts. I include references and sources.

Good enterprise architecture takes a lot of work. The process, roles, and responsibilities are well-defined. There is a benefit to following a model that others use. But does the benefit outweigh the cost?

“The fundamental quality of Enterprise Architecture is its vision of the future.”

– Angelo Andreetto in Is Enterprise Architecture Completely Broken?

The TOGAF framework emphasizes vision definition as early as possible. However, fully defining the vision and creating an implementation plan can take a substantial effort. The actual implementation of the vision could be many months into the future. This approach provides little agility for businesses that are driving fast and deep transformations.

“Our architecture was changing faster than you can draw it. As a result, it wasn’t useful to try to draw it.”

– Adrian Cockcroft in Agile Enterprise Architecture Finally Crosses the Chasm

I can’t recommend using an enterprise architecture framework that essentially follows a waterfall approach while development teams are using Agile and DevOps. The two cannot coexist without creating tension. Only one can emerge victorious – or perhaps neither; but the organization may fail in achieving the vision in the end.

In 2010, the IBM Software Group reported on why enterprise architecture (EA) programs were cancelled. I am listing the top ten reasons below. EA failure was deemed to be due to “overpromising and under-delivering” or to “people issues”. These failures are very concerning to me. The success factors / strategies reported that “people issues” was the primary driver of success.

  1. Insufficient time provided
  2. Project teams didn’t take advantage of the EA
  3. Too difficult to measure benefits
  4. Enterprise architects perceived as “ivory tower”
  5. Development teams couldn’t wait for enterprise architects
  6. No perceived benefit of EA program
  7. No executive endorsement
  8. Enterprise architects weren’t sufficiently flexible
  9. Enterprise architects perceived as impediment to success
  10. Insufficient funding

The IBM Software Group report made the following recommendations.

  • You need to understand the business
    • Architecture must be based on requirements, otherwise you are hacking
    • There are two aspects to architecture, business and technical
  • Individuals and interactions
    • Supplying models and documents isn’t sufficient
    • Support project teams
    • Roll up your sleeves and work closely with the teams
    • Architecture comes from teams, not individuals

I found this report to be quite enlightening. The report recommended more communication and interaction. There should be less focus on models and documents with more focus on solutions that work immediately. For example, reduce the technical risk on a project by proving the architecture with code. This is a recommendation that the TOGAF framework does not seem to support. But you must do this in an agile environment. I often tell people that the benefit of a good diagram is that it explains an idea or concept to many different people. They all can have a common understanding and then continue to work. The value of the diagram is not to create it as part of a framework; the value is in the benefit it provides to others.

Furthermore, the goal is not to create many diagrams. This just means more maintenance work over time. Diagrams can be thrown out when they no longer serve their intended purpose. Thus, another goal is to “travel light” as work moves forward. Use a slim model that can be quickly updated or replaced as needed. It seems to me that the report is recommending moving to a much more agile approach to enterprise architecture.

Scott W. Ambler provided the following principles for capturing enterprise architecture in an agile manner:

  • Organizations are complex systems
  • Complex systems cannot be managed at a fine-grained level, but only at a meta level (management by rules)
  • Documentation for complex systems should be coarse (high level)
  • Describe how things work in principle
  • Predictions should be fuzzy and described as ranged probabilities
  • It is more important to strengthen a system’s resiliency than it is to document
  • Accept some disorder and ambiguity
  • Working examples are more valuable than documents

I think that these principles support agile development. This is probably the right time to mention the Manifesto for Agile Software Development.

We are uncovering better ways of developing

software by doing it and helping others do it.

Through this work we have come to value:

Individuals and interactions over processes and tools

Working software over comprehensive documentation

Customer collaboration over contract negotiation

Responding to change over following a plan

That is, while there is value in the items on

the right, we value the items on the left more.

Thus, in my opinion, the enterprise architecture framework must support successful agile software development. It should not be the reverse situation. That is, agile software development must not support successful enterprise architecture implementation. In the latter case, both would fail because they cannot coexist in harmony.

An agile enterprise architecture framework that supports agile software development would benefit an organization. This would allow an organization to rapidly implement digital transformations in response to market pressures.

Next Steps

Marc Lankhorst lists two new enterprise architecture frameworks that provide a more agile approach: Scaled Agile Framework (SAFe) and Disciplined Agile Delivery (DAD). He provides a comparison of TOGAF’s Implementation Governance (Phase G in the ADM) with SAFe. Marc states that “agile methods strongly rely on feedback loops, whereas TOGAF’s governance is rather feed-forward in nature”.

I think that I need to read more of Marc’s blogs and other resources. I want a better understanding of what an agile enterprise architect must do to support the enterprise organization and the agile software development teams. At least, I want validation that my current understanding is on the right path.

Resources

Link Title Author Published
https://www.slideshare.net/ScottWAmbler/agile-enterprise-architecture-62467855 Agile enterprise architecture Scott W. Ambler May 27, 2016
https://www.forbes.com/sites/jasonbloomberg/2014/07/23/agile-enterprise-architecture-finally-crosses-the-chasm/#65e4035852a5 Is Enterprise Architecture Completely Broken? Jason Bloomberg July 11, 2014
https://www.forbes.com/sites/jasonbloomberg/2014/07/23/agile-enterprise-architecture-finally-crosses-the-chasm/#65e4035852a5 Agile Enterprise Architecture Finally Crosses the Chasm Jason Bloomberg July 23, 2014
https://www.agilealliance.org/wp-content/uploads/2016/01/Agile-Enterprise-Architecture.pdf Agile Strategies for Enterprise

Architects

IBM Software Group 2010
https://bizzdesign.com/blog/enterprise-architecture-and-agile-development-opposites-attract/ Enterprise Architecture and Agile Development: Opposites Attract? Marc Lankhorst May 28, 2016

TOGAF and ITIL

I recently earned the Open Group Certified TOGAF 9 Foundation and the ITIL Foundation certifications. Like others before me, I found points of integration between TOGAF and ITIL. However, I found it difficult to define the points of integration.

Here are a few resources that I recommend. Also, I recommend that readers keep in mind that authors often build upon the works of those who came before them.

Link Description Published
White Paper This white paper describes the development of TOGAF (The Open Group Architecture Framework) and ITIL® as a background to discussions about the potential overlap in the

processes they both describe. It does not describe the models themselves.

Sept, 2009
Webinar Traditionally, ITIL and TOGAF professionals have been part of different teams within an organization. Due to the ongoing alignment of business and IT, these professionals now often find themselves on the same team. Because of this crossover, there is a growing trend towards organization of work based on multiple best practice models. Aug, 2013
White Paper This White Paper traces the development of The Open Group Architecture Framework (TOGAF®) and ITIL® as a background to discussions about the potential overlap in the processes they both describe. It does not give an account of the models themselves. Aug, 2013
SlideShare This slide deck attempts to offer some concrete guidance on how Architectural activities and outputs can be integrated into the ITIL framework. The focus is on integrating into ITIL processes. Sept, 2014

Most of the time, I see an image showing the relationship like the one below. You can see the image in the first White Paper that I listed above. It shows a dividing line between ITIL and TOGAF as they cross domains and roles. The image implies that there is no overlap. This is because of the perspective. That is, ITIL was developed to support Service Management and TOGAF was developed to support organizations in the development of Enterprise Architecture. The focus of ITIL is therefore on services, whereas TOGAF is focused on architecture. Thus, the perspectives are different. The definition of perspective is a “point of view”. ITIL and TOGAF view business and information technology from different points of view. Thus, it is difficult to find overlap because of this difference.

I have also seen an image that shows more detail about the domains and implies overlap. This image describes the scope of ITIL and TOGAF. It implies some overlap. I understand that it is high-level; but I still want more details. The first White Paper and the Webinar includes the image below.

The following image provides specific points of overlap or connections. The Webinar includes the image below.

The Webinar seems to focus on a progression from enterprise architecture to solution design. This is one way to look at the relationship – and I do not think it is wrong. However, it seems to imply that there is a separation.

This SlideShare presentation provides a similar analysis as above; but it goes much further. Below is the primary view of TOGAF and ITIL provided by the author. The SlideShare presentation provides specific details where there is overlap between TOGAF and ITIL. This is what I felt was missing in previous analysis. I cannot do justice to explaining the detail provided in the presentation. It is quite extensive and well-thought out. Honestly, I have to keep coming back and reviewing the content to understand it.

Summary

There are well-defined points of integration or overlap between TOGAF and ITIL. There was an evolution of thought over this relationship. The SlideShare presentation summarizes this evolution and provides an excellent and detailed explanation of the integration or overlap. Of course, the new problem is when do you use TOGAF or ITIL? Perhaps both at times? Or perhaps it does not matter?

The next topic that I am pondering is agile enterprise architecture.

Creating a Point to Site VPN Connection to an Azure Virtual Network

In an earlier blog post on Creating an Azure VM with an Empty Data Disk, I created an Azure virtual machine in an Azure virtual network. In this blog post, I will create a Point to Site (P2S) VPN Connection to an Azure Virtual Network (Vnet). I will follow these steps:

  1. Generate and export certificates for Point-to-Site using PowerShell
  2. Run a PowerShell script to create the Vnet, add the VPN, and upload the public key information
  3. Connect to the Vnet from my desktop using a VPN connection
  4. Update the PowerShell script in my previous blog to create the VM in the front end subnet

My goal is to install an IBM Domino server on the data drive of the VM and then replicate Notes databases to it. I want to use a VPN connection to secure the data transfer.

Below is an architecture diagram of what I want to create (with some pending pieces).

Generate and Export Certificates for Point-to-Site using PowerShell

I followed the instructions on this website to generate and export certificates for Point-to-Site VPN using PowerShell.

I used example 1 in the second step to generate a client certificate.

I exported the root certificate public key (.cer) to a folder named AzureVPN on my C: drive.

I update the PowerShell script in the next section to reference the root certificate that I exported.

PowerShell Script

I used the PowerShell script posted in this Microsoft document Configure a Point-to-Site connection to a VNet using native Azure certificate authentication: PowerShell. I recommend that readers open this document as it contains details that I will not include. For example, the document contains the details on generating the certificates. I made some minor changes to the script. For example, I added comments and Write-Host statements. I moved a few more declarations to the top of the script.

I still need to configure a DNS server or just remove the -DnsServer
10.2.1.3
configuration from the script. I hope to come back to this at a later date.

Login-AzureRmAccount
Get-AzureRmSubscription | Sort-Object subscriptionName | Select-Object SubscriptionName
Select-AzureRmSubscription -SubscriptionName Pay-As-You-Go
# Configure a Point-to-Site connection to a VNet using native Azure certificate authentication: PowerShell
# https://docs.microsoft.com/en-us/azure/vpn-gateway/vpn-gateway-howto-point-to-site-rm-ps
# Declare the variables
$VNetName  = "VNetDomino1"
$FESubName = "FrontEnd"
$BESubName = "Backend"
$GWSubName = "GatewaySubnet"
$VNetPrefix1 = "192.168.0.0/16"
$VNetPrefix2 = "10.254.0.0/16"
$FESubPrefix = "192.168.1.0/24"
$BESubPrefix = "10.254.1.0/24"
$GWSubPrefix = "192.168.200.0/26"
$VPNClientAddressPool = "172.16.201.0/24"
$resourceGroup = "myDominoRG1"
$location = "Central US"
$GWName = "VNet1GW"
$GWIPName = "VNet1GWPIP"
$GWIPconfName = "gwipconf"

# Declare the variable for your certificate name, replacing the value with your own
$P2SRootCertName = "rootcertificate.cer"

# Replace the file path with your own
$filePathForCert = "C:\AzureVPN\rootcertificate.cer"

# Create a resource group
Write-Host "Create a resource group"  -ForegroundColor Green
New-AzureRmResourceGroup -Name $resourceGroup -Location $location

# Create the subnet configurations for the virtual network, naming them FrontEnd, BackEnd, and GatewaySubnet.
# https://docs.microsoft.com/en-us/azure/virtual-network/virtual-network-vnet-plan-design-arm
# The IP addresses of the subnets you specify must be fully contained within the IP address range for the Virtual Network it resides in.
# Subnet address spaces must not overlap within the Virtual Network.
Write-Host "Create the subnet configurations for the virtual network"  -ForegroundColor Green
$fesub = New-AzureRmVirtualNetworkSubnetConfig -Name $FESubName -AddressPrefix $FESubPrefix
# Only the front end server is accessible via the Internet
# This is where I will put my staging Domino VM
# Permit RDP access to selected front end VMs (ideally have RDP access to one VM only that is shut down until needed)
$besub = New-AzureRmVirtualNetworkSubnetConfig -Name $BESubName -AddressPrefix $BESubPrefix
# Note: I am not using the back end subnet yet
# Only the front end server can talk to the back end servers, and only on agreed upon ports.
# The back end servers cannot receive or send traffic from/to the public internet.
# The back end servers cannot talk to each other.
# Permit RDP access to the back end VMs from within the Vnet only.
$gwsub = New-AzureRmVirtualNetworkSubnetConfig -Name $GWSubName -AddressPrefix $GWSubPrefix

# Create the virtual network with three subnets
# DNS server setting is optional (and I need to configure the DNS server).
Write-Host "Create the virtual network"  -ForegroundColor Green
New-AzureRmVirtualNetwork -Name $VNetName -ResourceGroupName $resourceGroup -Location $location -AddressPrefix $VNetPrefix1,$VNetPrefix2 -Subnet $fesub, $besub, $gwsub -DnsServer 10.2.1.3

# Specify the variables for the virtual network you created
Write-Host "Specify the variables for the virtual network you created"  -ForegroundColor Green
$vnet = Get-AzureRmVirtualNetwork -Name $VNetName -ResourceGroupName $resourceGroup

# The Subnet name GatewaySubnet is mandatory for the VPN gateway to work.
$subnet = Get-AzureRmVirtualNetworkSubnetConfig -Name $GWSubName -VirtualNetwork $vnet

# Request a dynamically assigned public IP address
Write-Host "Request a dynamically assigned public IP address"  -ForegroundColor Green
$pip = New-AzureRmPublicIpAddress -Name $GWIPName -ResourceGroupName $resourceGroup -Location $location -AllocationMethod Dynamic
$ipconf = New-AzureRmVirtualNetworkGatewayIpConfig -Name $GWIPconfName -Subnet $subnet -PublicIpAddress $pip

# Configure and create the virtual network gateway for your VNet
# Use an Azure VPN gateway to provide a secure tunnel using IPsec/IKE
Write-Host "Configure and create the virtual network gateway for your VNet"  -ForegroundColor Green
New-AzureRmVirtualNetworkGateway -Name $GWName -ResourceGroupName $resourceGroup `
-Location $location -IpConfigurations $ipconf -GatewayType Vpn `
-VpnType RouteBased -EnableBgp $false -GatewaySku VpnGw1 -VpnClientProtocol "IKEv2"

# Add the VPN client address pool
Write-Host "Add the VPN client address pool"  -ForegroundColor Green
$Gateway = Get-AzureRmVirtualNetworkGateway -ResourceGroupName $resourceGroup -Name $GWName
Set-AzureRmVirtualNetworkGateway -VirtualNetworkGateway $Gateway -VpnClientAddressPool $VPNClientAddressPool

# Run the cmdlets
Write-Host "Run the cmdlets"  -ForegroundColor Green
$cert = new-object System.Security.Cryptography.X509Certificates.X509Certificate2($filePathForCert)
$CertBase64 = [system.convert]::ToBase64String($cert.RawData)
$p2srootcert = New-AzureRmVpnClientRootCertificate -Name $P2SRootCertName -PublicCertData $CertBase64

# Upload the public key information to Azure
Write-Host "Upload the public key information to Azure"  -ForegroundColor Green
Add-AzureRmVpnClientRootCertificate -VpnClientRootCertificateName $P2SRootCertName -VirtualNetworkGatewayname $GWName -ResourceGroupName $resourceGroup -PublicCertData $CertBase64

# NOTE: To resolve names in a peered virtual network, deploy your own DNS server, or use Azure DNS private domains. 
Write-Host "Finished!"  -ForegroundColor Green  


Connect to the Vnet from My Desktop

I get the public IP address of my Vnet: 104.43.209.61

I open the Point-to-site configuration for the VNet1GW virtual network gateway in Azure.

I click on Download VPN Client.

I click on Open.

Windows Explorer opens with three folders displayed. I open the WindowsAmd64 folder.

Note: You may have to copy the downloaded VPN zipped folder to another folder on your drive so that you can Run as Administrator.

I right-click on the VpnClientSetupAmd64 software and select Run as administrator.

I click Yes on the VNetDomino1 screen.

The VNetDomino1 VPN connection appears in the Network Settings \ VPN list.


I install the VpnServerRoot certificate stored in the Generic folder.

The Certificate Import Wizard screen appears. I leave the default settings as is and click Next. I repeat on the following screens.

I click OK on the final screen.

I return to Settings and select the VNetDomino1 connection.

I click on the connection and select Advanced Options. I click Edit and update the settings.

I save the settings.

I click on Connect.

I click on Connect on the next screen that appears.

The Connection Manager needs elevated privileges. I click on Continue.

The VPN connects!

I open the VPN configuration to see the settings.

I did have some trouble getting this VPN connection to work. But the steps above seem to be the final solution.

Update the PowerShell Script in My Previous Blog

I need to remove the creation of the public IP address, resource group, virtual network, subnet, and put the VM in the front end subnet.

Login-AzureRmAccount
Get-AzureRmSubscription | Sort-Object subscriptionName | Select-Object SubscriptionName
Select-AzureRmSubscription -SubscriptionName Pay-As-You-Go

# Configure a Point-to-Site connection to a VNet using native Azure certificate authentication: PowerShell
# https://docs.microsoft.com/en-us/azure/vpn-gateway/vpn-gateway-howto-point-to-site-rm-ps
# Declare the variables
$VNetName  = "VNetDomino1"
$FESubName = "FrontEnd"
$BESubName = "Backend"
$GWSubName = "GatewaySubnet"
$VNetPrefix1 = "192.168.0.0/16"
$VNetPrefix2 = "10.254.0.0/16"
$FESubPrefix = "192.168.1.0/24"
$BESubPrefix = "10.254.1.0/24"
$GWSubPrefix = "192.168.200.0/26"
$VPNClientAddressPool = "172.16.201.0/24"
$resourceGroup = "myDominoRG1"
$location = "Central US"
$GWName = "VNet1GW"
$GWIPName = "VNet1GWPIP"
$GWIPconfName = "gwipconf"

# Declare the variable for your certificate name, replacing the value with your own
$P2SRootCertName = "rootcertificate.cer"

# Replace the file path with your own
$filePathForCert = "C:\AzureVPN\rootcertificate.cer"

# Create a resource group
Write-Host "Create a resource group"  -ForegroundColor Green
New-AzureRmResourceGroup -Name $resourceGroup -Location $location

# Create the subnet configurations for the virtual network, naming them FrontEnd, BackEnd, and GatewaySubnet.
# https://docs.microsoft.com/en-us/azure/virtual-network/virtual-network-vnet-plan-design-arm
# The IP addresses of the subnets you specify must be fully contained within the IP address range for the Virtual Network it resides in.
# Subnet address spaces must not overlap within the Virtual Network.
Write-Host "Create the subnet configurations for the virtual network"  -ForegroundColor Green
$fesub = New-AzureRmVirtualNetworkSubnetConfig -Name $FESubName -AddressPrefix $FESubPrefix
# Only the front end server is accessible via the Internet
# This is where I will put my staging Domino VM
# Permit RDP access to selected front end VMs (ideally have RDP access to one VM only that is shut down until needed)
$besub = New-AzureRmVirtualNetworkSubnetConfig -Name $BESubName -AddressPrefix $BESubPrefix
# Note: I am not using the back end subnet yet
# Only the front end server can talk to the back end servers, and only on agreed upon ports.
# The back end servers cannot receive or send traffic from/to the public internet.
# The back end servers cannot talk to each other.
# Permit RDP access to the back end VMs from within the Vnet only.
$gwsub = New-AzureRmVirtualNetworkSubnetConfig -Name $GWSubName -AddressPrefix $GWSubPrefix
 
# Create the virtual network with three subnets
# DNS server setting is optional (and I need to configure the DNS server).
Write-Host "Create the virtual network"  -ForegroundColor Green
New-AzureRmVirtualNetwork -Name $VNetName -ResourceGroupName $resourceGroup -Location $location -AddressPrefix $VNetPrefix1,$VNetPrefix2 -Subnet $fesub, $besub, $gwsub -DnsServer 10.2.1.3
 
# Specify the variables for the virtual network you created
Write-Host "Specify the variables for the virtual network you created"  -ForegroundColor Green
$vnet = Get-AzureRmVirtualNetwork -Name $VNetName -ResourceGroupName $resourceGroup
# The Subnet name GatewaySubnet is mandatory for the VPN gateway to work.
$subnet = Get-AzureRmVirtualNetworkSubnetConfig -Name $GWSubName -VirtualNetwork $vnet
 
# Request a dynamically assigned public IP address
Write-Host "Request a dynamically assigned public IP address"  -ForegroundColor Green
$pip = New-AzureRmPublicIpAddress -Name $GWIPName -ResourceGroupName $resourceGroup -Location $location -AllocationMethod Dynamic
$ipconf = New-AzureRmVirtualNetworkGatewayIpConfig -Name $GWIPconfName -Subnet $subnet -PublicIpAddress $pip
 
# Configure and create the virtual network gateway for your VNet
# Use an Azure VPN gateway to provide a secure tunnel using IPsec/IKE
Write-Host "Configure and create the virtual network gateway for your VNet"  -ForegroundColor Green
New-AzureRmVirtualNetworkGateway -Name $GWName -ResourceGroupName $resourceGroup `
-Location $location -IpConfigurations $ipconf -GatewayType Vpn `
-VpnType RouteBased -EnableBgp $false -GatewaySku VpnGw1 -VpnClientProtocol "IKEv2"
 
# Add the VPN client address pool
Write-Host "Add the VPN client address pool"  -ForegroundColor Green
$Gateway = Get-AzureRmVirtualNetworkGateway -ResourceGroupName $resourceGroup -Name $GWName
Set-AzureRmVirtualNetworkGateway -VirtualNetworkGateway $Gateway -VpnClientAddressPool $VPNClientAddressPool
 
# Run the cmdlets
Write-Host "Run the cmdlets"  -ForegroundColor Green
$cert = new-object System.Security.Cryptography.X509Certificates.X509Certificate2($filePathForCert)
$CertBase64 = [system.convert]::ToBase64String($cert.RawData)
$p2srootcert = New-AzureRmVpnClientRootCertificate -Name $P2SRootCertName -PublicCertData $CertBase64
 
# Upload the public key information to Azure
Write-Host "Upload the public key information to Azure"  -ForegroundColor Green
Add-AzureRmVpnClientRootCertificate -VpnClientRootCertificateName $P2SRootCertName -VirtualNetworkGatewayname $GWName -ResourceGroupName $resourceGroup -PublicCertData $CertBase64
 
# NOTE: To resolve names in a peered virtual network, deploy your own DNS server, or use Azure DNS private domains. 
Write-Host "Finished!"  -ForegroundColor Green 

Connecting to the Virtual Machine via RDP

Below is the network interface configuration for the virtual machine.

I open the virtual machine record in Azure.

I click on .

The RDP connection record opens.

I keep the settings as is and click on .

I click Open.

I click on Connect.

Connecting to …

The connection is made and I enter credentials. These are the same credentials I entered when the PowerShell script ran to create the VM.

I click Yes to continue.

The RDP connection is made and the Windows Server desktop is displayed.

I can see both drives (C and D) in Files Explorer.

Setting the D: Drive for Permanent Storage.

I initialize the D: drive.

I then follow the step-by-step instructions here to use the D: drive as a data drive on a Windows VM.

The VM now has three drives. The Temporary Storage drive is used for paging files. The Data Volume drive will be used for running the Domino server (i.e. permanent storage).

I wish that this drive configuration was easier to perform. In the future, I will use an ARM template after getting this configuration right.

Next Steps

I need to install the Domino server software, add the server to my domain, and replicate Notes databases to it. I won’t post a blog on how to do that. I suspect that it only interests a handful of people. 😉

Resources

My previous blog post on Creating an Azure VM with an Empty Data Disk.

Click here to read more about planning virtual networks.

Click here to watch a YouTube video presenting a step by step tutorial on creating an Azure VPN point to site setup. This video was published in December, 2016; but it was very helpful to me. However, I followed a slightly different process and included links to the websites that had the steps that I followed.

Click here to read the source document titled “Connect an on-premises network to Azure using a VPN gateway” that contains the Microsoft Visio network diagram.

Click here for steps on how to generate and export certificates for Point-to-Site VPN using the Azure portal.

Click here for steps on how to add a second root certificate to give VPN access to a second computer. First generate a new root certificate. Then follow steps 9 to 11.

Using WorkBoard to Manage Objectives and Key Results for Enterprise Architecture

In an earlier blog, I described how a user can use WorkBoard in Microsoft Teams. In this blog, I am writing about how WorkBoard can be used to define the objectives of enterprise architecture and the associated metrics. TOGAF 9.1 states that enterprise architectures must meet the “strategic, interim, and tactical business objectives and aspirations”. Normally, key elements of the Architecture Vision — such as the enterprise mission, vision, strategy, and goals — are documented as part of a wider business strategy or enterprise planning activity.

There are some tools specifically developed for managing the goals and metrics of enterprise architecture. I’m not performing a comparison with those tools in this blog posting.

What are the Objectives of Enterprise Architecture?

One of the challenges of defining the objectives of enterprise architecture is that they seem to end up being the objectives of IT operations. That is not exactly how it is supposed to be.

TOGAF 9.1 identifies the business strategy, business goals, and business drivers of the organization in Phase A: Architecture Vision. These are assumed to be defined outside of the enterprise architecture activity. I found an article titled Enterprise IT Architecture: Goals, Trends and Perspectives published online on http://www.SandHill.com. The authors provided prospective strategic IT goals (or objectives):

  • Implementing a new business process management methodology
  • Automating and optimizing primary business processes
  • Supporting new products
  • Adapting IT systems to meet new market requirements
  • Estimating required investments in technology modernization
  • Calculating potential financial and efficiency returns from the strategic IT plan

I have a few other enterprise architecture objectives that I want to see included:

  • Improve social collaboration between employees and with outside partners and customers
  • Improve usability of mobile devices with business and web applications for employees and customers

Note: This is not a comprehensive list of goals or objectives by any means. However, I found the article interesting since it also described using the Zachman framework for analysis of an enterprise IT strategy.

Each of these goals (or objectives) could fit into one or more work streams. At least, I am calling them work streams here because that is how they fit into what WorkBoard provides.

  • Operational productivity: improve efficiency to create a quick return on investment
  • Optimization of business processes: include an analysis of the entire process, not just its separate parts
  • Mass customization: Customer involvement results in greater levels of client and market satisfaction

What are the Metrics (or Key Results) for the Objectives?

The metrics should be sufficiently clear so that the vision phase (in TOGAF 9.1) may scope the business outcomes and resource requirements, and define the outline enterprise business information requirements and associated strategies of the enterprise architecture work to be done. For example, these may include:

  • Business requirements
  • Cultural aspirations
  • Organization intents
  • Strategic intent
  • Forecast financial requirements

I used metrics from the following online articles:

12 critical metrics for IT success from cio.com

7 Key Enterprise Architecture Metrics from scribd.com

Obtaining Enterprise Architecture Metrics – Part 1 from microsoft.com (Sadly, this blog post written by Mike Walker is no longer available.)

WorkBoard and OKRs

WorkBoard uses Key Results in place of metrics. The image on the right comes from the Elevate Business Performance with OKRs document published by Workboard Inc.

You can see the flow from Objective to Insight.

However, you don’t see that OKRs (Objectives – Key Results) can be related by using work streams.

My Sample Objective – Key Results (OKRs)

I created a list of OKRs in the table below. These are examples and you should configure OKRs that match your organization’s strategic objectives.

Objective Key Results Rating (examples) Work Stream
Continuous improvement of online services Online application performance. The average time it takes to render a screen or page. Less than 1 second Operational Productivity
Continuous improvement of online services Online application availability. The percentage of time the application is functioning properly. 100% Operational Productivity
Continuous improvement of online services Production incidents. The number of production problems by severity. Zero Operational Productivity
Reducing costs by leveraging common solutions and rationalizing processes, technology, and data. Architectural Integrity. The percent of applications on preferred technologies, another indication of how difficult applications are to maintain 100% Operational Productivity
Improve enterprise architecture delivery Project satisfaction. The average score from post project surveys completed by business partners. 100% Optimization of business processes
Improve enterprise architecture delivery Project delivery. The percentage of projects delivered on time. 100% Optimization of business processes
Improve enterprise architecture delivery Project cost. The percentage of projects delivered within the cost estimate. 100% Optimization of business processes

I also would like to compare the OKRs that I have with other enterprise architects. I suppose that some of the common tools will come with a more complete sample list.

Entering OKRs into WorkBoard

I entered the OKRs into WorkBoard. The three main objectives are displayed below.

I click on the first objective and it expands to display the key results.

I can also open the objective to see the Key Results, Work streams, and Comments.

I click on and I can see all of the work streams. The new workstreams that I created are displayed.

I click on Operational Productivity and the display changes.

I click on the 2 Objectives tab and the two objectives for the Operational Productivity work stream are displayed.

Microsoft Teams

I want to see what information that I can add from WorkBoard to the Enterprise Architecture tab in the Contoso IT channel.

I add Workboard to the Contoso IT team.

I select the Enterprise Architecture channel and click on Set up for the Tab.

I click on the Boards.

I select Operational Productivity. This is the same work stream that I displayed earlier in Workboard. I click Save to continue.

The Operational Productivity board view is displayed – just like I can see it in Workboard.

I can add tabs to display the other work streams, too.

Next I add the Business Review to a new tab in Microsoft Teams. Now I can see exactly what I saw in Workboard. I may not even have to go to the Workboard site.

Next Steps

I need a more robust and complete list of OKRs for enterprise architecture. At least, a better list to start with. Still, I feel like Workboard can be used to manage this information for enterprise architects.

Conclusion

I have added sample OKRs for enterprise architecture. Then I added tabs in Microsoft Teams for a work stream and a business review. I can continue my enterprise architecture work on Workboard from within Microsoft Teams.

It looks like Workboard can be used for managing enterprise architecture OKRs.

Creating an Azure VM with an Empty Data Disk

I was trying to create an Azure virtual machine to run a Domino server online with the following features:

  • Use PowerShell only
  • Latest version of Windows Server
  • Set auto-shutdown
  • Set user credentials on Windows Server
  • Add an empty second disk
  • A virtual network
  • A network security group with predefined rules
  • A public IP address to connect to
  • A storage account for logging and other files
  • Add OMS ID and Key (just in case)
  • Everything in one resource group and location
  • Configuration settings at the top of the script
  • Add comments
  • Write to the screen during processing

I experienced a lot more issues than I ever planned for. I thought that a complete PowerShell script must be available online. However, I could not find one. Thus, I am publishing the one that I created.

The PowerShell Code

Login-AzureRmAccount
Get-AzureRmSubscription | Sort-Object subscriptionName | Select-Object SubscriptionName
Select-AzureRmSubscription -SubscriptionName Pay-As-You-Go

# Declare the variables
$resourceGroup = "myDominoRG1"
$location = "Central US"
$vmName = "myDominoVM1"
$subnetName = 'SubNetDomino1'
$vnetName = "VNetDomino1"
$nsgName = "NSGDomino1"
$VMSize = "Basic_A2"
$storageType = 'Premium_LRS'
$dataDiskName = $vmName + '_datadisk1'
$strNum = 128
[int]$diskSizeInGB = [convert]::ToInt32($strNum, 10)
# Storage Account Name (must be lowercase)
$myStorageName = "mydominostorage1"

# set autoshutdown time for VM
$shutdown_time = "1700"
$shutdown_timezone = "Central Standard Time"

# OMS ID and OMS key
# Leave as is if you do not have an OMS ID and OMS key
$omsId = ""
$omsKey = ""

# Create user object
Write-Host "Create user object"  -ForegroundColor Green
$cred = Get-Credential -Message "Enter a username and password for the virtual machine."

# Create a resource group
Write-Host "Create a resource group"  -ForegroundColor Green
New-AzureRmResourceGroup -Name $resourceGroup -Location $location

# Create a storage account for this resource group
Write-Host "Create a storage account"  -ForegroundColor Green 
New-AzureRMStorageAccount -ResourceGroupName $resourceGroup -Location $Location -AccountName $myStorageName -SkuName Standard_LRS

# Create a subnet configuration
Write-Host "Create a subnet configuration"  -ForegroundColor Green
$subnetConfig = New-AzureRmVirtualNetworkSubnetConfig -Name $subnetName -AddressPrefix 192.168.1.0/24

# Create a virtual network
Write-Host "Create a virtual network"  -ForegroundColor Green
$vnet = New-AzureRmVirtualNetwork -ResourceGroupName $resourceGroup -Location $location `
  -Name $vnetName -AddressPrefix 192.168.0.0/16 -Subnet $subnetConfig

# Create a public IP address and specify a DNS name
Write-Host "Create a public IP address and specify a DNS name"  -ForegroundColor Green
$pip = New-AzureRmPublicIpAddress -ResourceGroupName $resourceGroup -Location $location `
  -Name "mypublicdns$(Get-Random)" -AllocationMethod Static -IdleTimeoutInMinutes 4

# Create an inbound network security group rule for port 3389
Write-Host "Create an inbound network security group rule for port 3389"  -ForegroundColor Green
$rdpRule = New-AzureRmNetworkSecurityRuleConfig -Name "myRDPRule" -Description "Allow RDP" `
    -Access "Allow" -Protocol "Tcp" -Direction "Inbound" -Priority "140" `
    -SourceAddressPrefix * -SourcePortRange * `
    -DestinationAddressPrefix * -DestinationPortRange 3389 

# Create an inbound network security group rule for port 80
Write-Host "Create an inbound network security group rule for port 80"  -ForegroundColor Green
$httprule = New-AzureRmNetworkSecurityRuleConfig -Name "myHTTPRule" -Description "Allow HTTP" `
    -Access "Allow" -Protocol "Tcp" -Direction "Inbound" -Priority "100" `
    -SourceAddressPrefix "Internet" -SourcePortRange * `
    -DestinationAddressPrefix * -DestinationPortRange 80

# Create an inbound network security group rule for port 1352
Write-Host "Create an inbound network security group rule for port 1352"  -ForegroundColor Green
$notesrule = New-AzureRmNetworkSecurityRuleConfig -Name "myIBMNotesRule" -Description "Allow IBM Notes" `
    -Access "Allow" -Protocol "Tcp" -Direction "Inbound" -Priority "120" `
    -SourceAddressPrefix "Internet" -SourcePortRange * `
    -DestinationAddressPrefix * -DestinationPortRange 1352

# Create a network security group
Write-Host "Create a network security group"  -ForegroundColor Green
$nsg = New-AzureRmNetworkSecurityGroup -ResourceGroupName $resourceGroup -Location $location `
  -Name $nsgName -SecurityRules $rdpRule,$httprule,$notesrule

# Create a virtual network card and associate with public IP address and NSG
Write-Host "Create a virtual network card and associate with public IP address and NSG"  -ForegroundColor Green
$nic = New-AzureRmNetworkInterface -Name myNic -ResourceGroupName $resourceGroup -Location $location `
  -SubnetId $vnet.Subnets[0].Id -PublicIpAddressId $pip.Id -NetworkSecurityGroupId $nsg.Id

# Create a virtual machine configuration
Write-Host "Create a virtual machine configuration"  -ForegroundColor Green
$vmConfig = New-AzureRmVMConfig -VMName $vmName -VMSize $VMSize | `
Set-AzureRmVMOperatingSystem -Windows -ComputerName $vmName -Credential $cred | `
Set-AzureRmVMSourceImage -PublisherName MicrosoftWindowsServer -Offer WindowsServer -Skus 2016-Datacenter -Version latest | `
Add-AzureRmVMNetworkInterface -Id $nic.Id
Write-Host "Add an empty data disk to the virtual machine configuration"  -ForegroundColor Green
#$vmConfig = Add-AzureRmVMDataDisk -VM $vmConfig -Name $dataDiskName -CreateOption Empty -ManagedDiskId $dataDisk1.Id -Lun 1
$vmConfig = Add-AzureRmVMDataDisk -VM $vmConfig -Name $dataDiskName -DiskSizeInGB $diskSizeInGB -CreateOption Empty -Lun 1

# Create a virtual machine
Write-Host "Create a virtual machine using the virtual machine configuration"  -ForegroundColor Green
New-AzureRmVM -ResourceGroupName $resourceGroup -Location $location -VM $vmConfig

# Set the auto-shutdown time
Write-Host "Set the auto-shutdown time for the virtual machine"  -ForegroundColor Green
$properties = @{
    "status" = "Enabled";
    "taskType" = "ComputeVmShutdownTask";
    "dailyRecurrence" = @{"time" = $shutdown_time };
    "timeZoneId" = $shutdown_timezone;
    "notificationSettings" = @{
        "status" = "Disabled";
        "timeInMinutes" = 30
    }
    "targetResourceId" = (Get-AzureRmVM -ResourceGroupName $resourceGroup -Name $vmName).Id
}

New-AzureRmResource -ResourceId ("/subscriptions/{0}/resourceGroups/{1}/providers/microsoft.devtestlab/schedules/shutdown-computevm-{2}" -f (Get-AzureRmContext).Subscription.Id, $resourceGroup, $vmName) -Location (Get-AzureRmVM -ResourceGroupName $resourceGroup -Name $vmName).Location -Properties $properties -Force

# Setting up WinRM access

# Initialize the data disk

# Install and configure the OMS agent
If ($omsId -ne "") {
    Write-Host "Install and configure the OMS agent"  -ForegroundColor Green
    $PublicSettings = New-Object psobject | Add-Member -PassThru NoteProperty workspaceId $omsId | ConvertTo-Json
    $protectedSettings = New-Object psobject | Add-Member -PassThru NoteProperty workspaceKey $omsKey | ConvertTo-Json

    Set-AzureRmVMExtension -ExtensionName "OMS" -ResourceGroupName $resourceGroup -VMName $vmName `
        -Publisher "Microsoft.EnterpriseCloud.Monitoring" -ExtensionType "MicrosoftMonitoringAgent" `
        -TypeHandlerVersion 1.0 -SettingString $PublicSettings -ProtectedSettingString $protectedSettings `
        -Location $location
}
Write-Host "Finished!"  -ForegroundColor Green

Final Result

One resource group contains all of the resources created by the PowerShell script.

The network security group contains the correct security rules.

A public Internet address is configured.

The virtual machine is configured correctly and it started.

A second data disk was added to the virtual machine.

Update [July 11, 2018]: Follow the step-by-step instructions here to use the D: drive as a data drive on a Windows VM.

Resources

I referenced a number of resources to create this script. Below are a few of the important ones.

Create a fully configured virtual machine with PowerShell

https://docs.microsoft.com/en-us/azure/virtual-machines/scripts/virtual-machines-windows-powershell-sample-create-vm?toc=%2fpowershell%2fmodule%2ftoc.json

Create an Operations Management Suite monitored VM with PowerShell

https://docs.microsoft.com/en-us/azure/virtual-machines/scripts/virtual-machines-windows-powershell-sample-create-vm-oms?toc=%2fpowershell%2fmodule%2ftoc.json

Add-AzureRmVMDataDisk

https://docs.microsoft.com/en-us/powershell/module/azurerm.compute/add-azurermvmdatadisk

New-AzureRmVM

https://docs.microsoft.com/en-us/powershell/module/azurerm.compute/new-azurermvm?view=azurermps-6.3.0

Attach a data disk to a Windows VM using PowerShell

https://docs.microsoft.com/en-us/azure/virtual-machines/windows/attach-disk-ps


Next Steps

Initialize the data disk and install the Domino server software. As it is now, the second data disk can be used for any purpose.

I want to have a data disk in storage that has the Domino server software installed; but not configured. Then I can attach it to the VM. That would save time for multiple virtual machines.

I want to use a VPN connection to the virtual network. The public IP address should be VPN gateway. The virtual machines would not be exposed to the Internet directly. All connections would go through the VPN gateway.

I should be using an Azure Resource Manager (ARM) template. I want to deploy the resources consistently and repeatedly.

Using Microsoft Teams with WorkBoard

I’m finally getting back to blogging on Microsoft Teams. I had some computer issues and a daughter’s graduation party to contend with.

I’m interested in strategic execution. I hear many organizations talk about the importance of having a strategy; but very few execute it well. They usually get lost in daily and weekly fire-fighting. About 12 to 13 years ago, I was looking at a product from IBM called Workplace for Business Strategy Execution. It looked really good; but it was incredibly hard to install on WebSphere Portal 5.0. In fact, it was so hard that I thought that I was the only one in North America who could do it. I sent my step-by-step instructions to IBM at one point. Sadly, it appears that product never did well.

In this blog, I am looking at WorkBoard (https://www.workboard.com/) and how it integrates with Microsoft Teams. The WorkBoard website states that “Workboard’s solution helps organizations set, measure and execute strategic priorities faster”. You can read their website for up-to-date information. I will spend some time in the WorkBoard application. I want to create some content that I can then display in a conversation in Microsoft Teams. Then I want to see what I can do in Microsoft Teams.

Note: I am creating this blog post from within Word using a Blog Post template. I hope that it works out well.

Creating Accounts

I register one free accounts on workboard’s site: https://www.myworkboard.com. I send an invite to a two more team members during registration.

  • Megan Bowen – Marketing Manager
  • Isaiah Langer – Sales Rep
  • Emily Braun – Budget Analyst

Note: I entered the email address as all lower case.

Then I click on .

All three accounts received an email from WorkBoard, too. I quickly register the additional accounts by clicking on in the email. You can add more team members later by clicking on in the workspace.

Later, I can see who is on my team by clicking on . All three accounts are part of my team!

Key Terminology

It is helpful to have definitions of some key terms. I’m going to use the terminology that WorkBoard uses in their help documentation. https://workboard.zendesk.com/hc/en-us/articles/216294188-Overview-of-objectives-and-key-results

Set inspiring objectives for your team to get everyone aligned to one mission. Objectives should the drive work the team does, so the team doesn’t spend its time reacting to fire drills and emails.

Quantify success with fact-based key results for each objective. Key results define how you will measure success for your objective in a given time period.

The objective is what you want to achieve; key results are how you define and measure success.

Use workstreams to categorize and organize what the team needs to do to reach its objective and key results. That is, organize and plan work to hit the key results with workstreams.

Divide and conquer the work by assigning and scheduling action items.

The image below comes from the Elevate Business Performance with OKRs document published by Workboard Inc. I recommend that you read through this document to better understand OKRs. I am not planning to restate what WorkBoard has already provided.

Starting with WorkBoard

Workboard opens in my web browser with a pop-up screen displayed. I am using WorkBoard basic – free for up to 10 users. I read the screen and click on OK.

The left hand navigation displays what is important to me. It looks like I have three action items for today with 8 action items for this week. The good news is that none of my tasks are overdue!

The main window pane shows my action items in a calendar. Here I can see the action items for today and the week.

I want to add some Objectives. I click on . The Objectives workspace appears in the web browser.

I click on to set my first objective.

The workspace changes to …

I like the heat map! Green is good and red is bad.

I click on to create my first objective. I take content for marketing objectives from http://www.yourarticlelibrary.com/marketing/marketing-management/5-objectives-of-marketing-management/27961.

I need to align the objective later. I click to set a Key Result.

This is where more time needs to be spent. It’s one thing to set an objective; but now I am quantifying it with a Key Result. This objective is tough to measure; but I need to put something in.

Note: WorkBoard provides good examples for OKRs.

I save the result and click Next to Align It.

I do not have any dependencies defined yet; but there are built-in workstreams for Contoso Marketing! I select Campaign and Social Marketing and click Done.

I now have an objective displayed.

There is so much more that I can do here. I know that I am just barely touching the capabilities of WorkBoard. I will have to explore it later.

Microsoft Teams

It’s time to integrate the bot! I click on in Microsoft Teams.

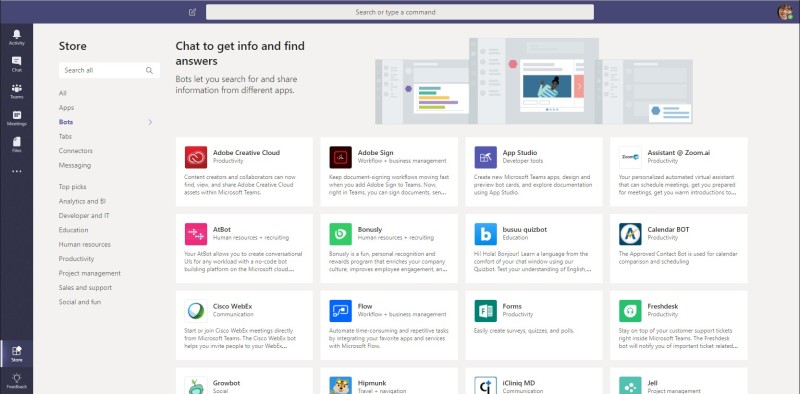
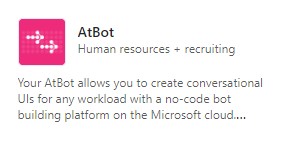
I search for WorkBoard in the Store and click on the tile.

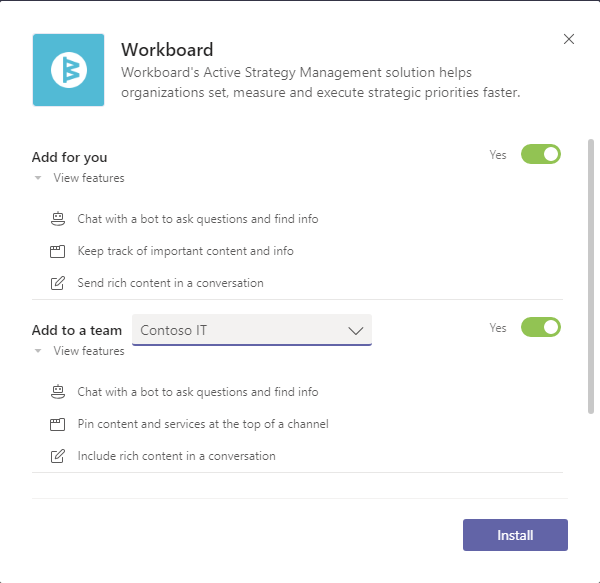
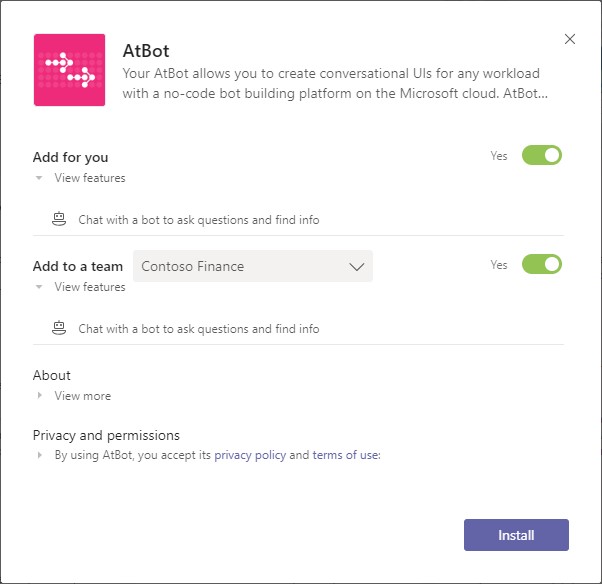
I select the X1050 Launch Team and keep both Yes settings. I click Install.

I select the Digital Assets Web channel and setup the Bot.

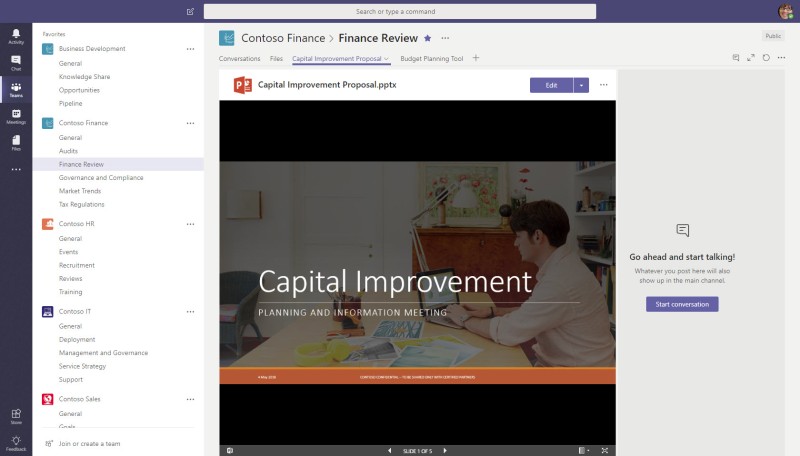
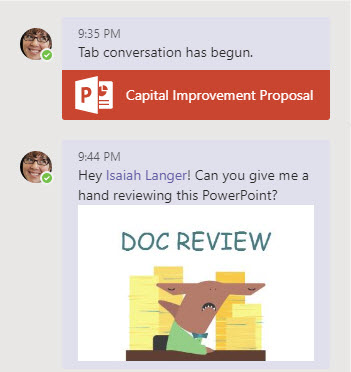
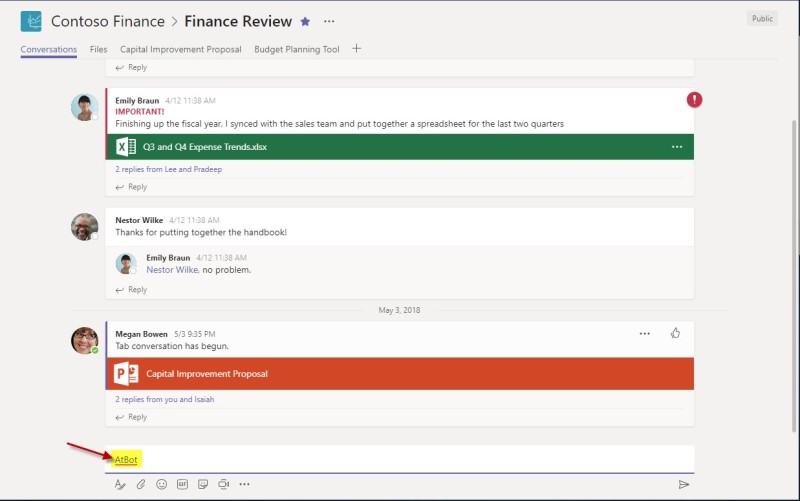
The Conversation screen for the Digital Assets Web channel in the X1050 Launch Team opens. “Workboard” appears in the chat.

Like many power users, I forgo training and just try it out. I type in “How am I doing?”. I get a response from WorkBoard. I have some starter messages that I can use with Wobot.

I click on Connect with Workboard.

Note: I had to disable blocking of pop-ups.

I log into WorkBoard.

I then pick my account.

I accept the next screen.

A window displaying all of my integration settings appears. There are many of them. I can see that the integration with Microsoft Teams is enabled.

There are also some sample chats displayed for me.

– How am I doing on my objectives? 
– Show my calendar 
– Show my 1on1s with Mary 
– Reschedule meetings for today 
– Get my Outlook calendar 
– Create an action item 
– Show my results 
– For more conversation starters, ask WoBot to “help me”, “help me with objectives” or “help me with meetings”! (And Workboard chatbot has a sense of humor — say “Tell me a joke” for a quick smile.)

Chatting with Wobot

I return to the conversation and enter “@Workboard How am I doing on my objectives?” in the chat. I get an immediate response.

I respond with “Yes”. The response is good for me! I am in the green! I know that is good since red would be bad.

There is the new Objective that I created.

I created a new action item using Wobot.

Wobot provides editing features for the action item.

Here is the action item in WorkBoard.

Now I will assign this action item to Isaiah Langer and update it.

That did feel good!

I log in as Isaiah Langer and see the action item listed in Requests for me.

What if I need help with WorkBoard objectives in Microsoft Teams?

What if I need help with WorkBoard workstreams in Microsoft Teams?

I can ask Wobot to list all of my workstreams. It displays them one after the other.

What I Have Not Tried Yet

I have not had time to:

  • try all of the features in WorkBoard
  • setup the Tab or Messaging with Microsoft Teams
  • show the WorkBoard mobile app
  • show content in the Microsoft Teams app
  • try more interaction between users in WorkBoard and Microsoft Teams
  • demonstrate what WorkBoard provides in reports in Microsoft Teams

Conclusion

I barely touched on what WorkBoard is and does. I think that I’m seeing only the beginning of Wobot’s integration with Microsoft Teams. Yet it looks good. Like many other tools and bots that integrate with Microsoft Teams, I can do the heavy work in WorkBoard and the light work in Microsoft Teams.

In my past blogs, I often refer to this as wanting to work across multiple Teams in one UI. In this case, I think WorkBoard is the UI that allows me to work on multiple teams. That is, teams that are using WorkBoard.

I think the challenge for Team administrators is knowing when to integrate with WorkBoard. The simple answer may be: integrate with WorkBoard when your team is working on a strategic initiative.

Using Microsoft Teams with AtBot

In my last blog posting, I wrote about using Microsoft Teams with files. In this blog posting, I review how I can use Microsoft Teams with a bot. I like the idea of making my work easier.
I open the Store and click on Bots. I have a lot of Bots to choose from!

Teams45

AtBot from Bizzy

First, I need a bot that creates tasks in Planner for me. Why should I switch screens to my Planner tab or app when I can do it in chat? I want my work to be easier!

I click on AtBot.

Teams46

I configure the AtBot settings. I add it to my Contoso Finance team. I click Install.

Teams47

I add the bot to my Finance Review channel.

Teams48

I click Set up. I am taken to the Conversations tab in the Finance Review channel. “AtBot” appears in the chat.

Teams49

Then I set up the Flow template for AtBot. I click on this link https://us.flow.microsoft.com/en-us/galleries/public/templates/3c1e91d6d840478fbcd9f8d67a482737/new-task/

It opens a New Task in Flow in Office 365.

Teams50

I click on Sign In.

Teams51

I select Megan’s account.

Teams52

I click Accept. The details are updated in the screen.

Teams53

I click Continue. The flow is displayed.

Teams54

I update the Plan task to create new tasks in the To do bucket in the Product Launch Event plan.

Teams55

I click Save and my task is saved.

I return to my chat in the Conversations tab in the Finance Review channel. I’m not sure what to do …

Teams56

I open Chat.

Teams57

I see my private message.

Teams58.jpg

I click on Login to Office 365. I have to accept the AtBot permissions again.

Teams59

I close the window and return to chat. The conversation is updated. I’m learning as I go!

Teams60

I click on Help.

Teams61

Perfect! I know what to do … I type in “@AtBot new task”. Now it is working!

Teams62

I answer the questions in the conversation.

Teams63

I click on here to view the task. Planner opens up and I can view My Tasks.

Teams64

I click on the task to view the details.

Teams65

Cool! It worked! I can use AtBot to create Planner tasks within Conversations. So much easier! No longer do I have to switch apps in order to complete my work. Also, I know that I can modify the Flow to add more details to the Planner task. I may explore this more in a future blog post.

Click here to learn more about AtBot from Bizzy. https://atbot.io/

Please read my blog on Using Microsoft Teams and Planner for more info on using Planner.

In my next blog, I will look at how I can use the WorkBoard bot in Microsoft Teams.

Using Microsoft Teams with Files

In my last blog post, I wrote about using Microsoft Teams and conversations. In this blog posting, I review how I can manage and upload files across multiple teams and multiple Office 365 products. Personally, I find it hard to manage all the files that I use and share. I like keeping them organized without having multiple copies floating around. I do like syncing files between the cloud and my local computer.

Files in a Team

Every channel in a Microsoft Team site has a Files tab.

Teams18

The files are accessible to all team members. Team members can also move a file to its own tab. The Fiscal Year Budget Projection spreadsheet is displayed in a tab. Team members can edit the spreadsheet within the Teams site. Team members can also start a conversation on a file (see my previous blog post).

Teams19

But where are these files stored?

Files in SharePoint

Every Microsoft Teams site has an Office 365 group and a SharePoint site created. The SharePoint site contains conversations, documents, notebooks, and pages. The documents are displayed in the lower right under the Documents heading.

Teams20

The documents for each channel are stored in a separate folder. Teams21
For example, documents in the Audits channel are stored in the Audits folder.

The same three files appear in the Audits folder that we just saw in the Teams channel.

Teams22

Megan Bowen has opened the SharePoint site and wants to view all of the documents. Megan clicks on See all.

Teams23

The web browser updates to display the Documents. The folders still display the channels.

Files and OneDrive on Computer

Megan clicks on Teams24 to sync the folders and files from this library to her computer.

Teams25

Megan can now see the folders and files on her local drive.

Teams26

Megan opens the Audits folder to see the same three files.

Teams27

Thus, Megan would not have to open each team site or the SharePoint site to work with the files. Megan can also create or upload files in a folder and sync the folder with the SharePoint / Team site.

Files and OneDrive on Mobile Device

Megan also uses her iPhone to access files via her OneDrive app.

Megan opens her app to Sites. Here she can see all of the SharePoint Sites.  Teams28
Megan clicks on the Contoso Finance site and sees the Documents folder. The Contoso Finance site is the SharePoint site for the Microsoft team of the same name.  Teams29
Megan clicks on the documents folder to see a list of the folders. The folders represent each channel in the team site.  Teams30
Megan then clicks on the Audits folder to see the documents that are contained on the Files tab in the Audits channel of the Microsoft team.
Now Megan can add files to the folder. The files will appear on the SharePoint site, the Team site, and on her computer’s OneDrive (after being synced).
 Teams31

Files and OneDrive

Megan has a lot of files on her OneDrive.

Teams32

As much as Megan uses Microsoft Teams to manage her team work, she uses OneDrive to manage her files. Megan can see the list of her sites / teams on the left side of the OneDrive screen.

Megan clicks on Contoso Finance to open the documents folder. She can see the folders that represent the channels.

Teams33

Megan clicks on the Audits folder. Now she can see the same three files that she viewed in other products.

Teams34

But Megan can also perform the following functions in OneDrive Online:

  1. She can view all of her other files. Thus, she can copy or move folders and files within OneDrive.
  2. She can create a Flow. Flow is used to create automated workflows between your apps and services. Flow can provide notifications, synchronize files, collect data, and more. Click here to learn more about Microsoft Flow.
  3. She can sync her folders and files to her computer.

I believe that Megan can be productive with files within a team site; but use OneDrive Online to be productive with files across multiple team sites. However, Megan will not be able to view team conversations posted to a file when using OneDrive Online. These conversations stay in the team site.

Files and Outlook Online

I prefer not to use Outlook as my file manager; but it does display my team site files. The screenshot below displays the Office 365 groups in Megan’s Outlook client. The Contoso Finance group is the group used by the Microsoft Team of the same name. The files in the Contoso Finance group are displayed when the Files tab is clicked.

Teams35.jpg

The difference in Outlook is that the files are not displayed within their channels or folders.

Megan uploads a file named lunar-eclipse.jpg. Where does the file end up?

Teams36

Megan clicks on Files in the navigation bar on the left side of her Microsoft Teams. The new file appears at the top of the list. The file’s location is listed as /sites/ContosoFinance/SharedDocuments.

Teams37

I looked through each channel and Files tab in the Contoso Finance team; but I did not find the new file listed.

Next I opened the SharePoint site for Contoso Finance. I see the new file listed in the Activity and Documents section.

Teams38.jpg

Thus, in my opinion, using Outlook to work with files is useful if you don’t want to see the channels or folders. But it is not useful for uploading new files into a team channel or SharePoint folder. The team members will not see the file unless they click on Files on the left navigation of Teams or go to the SharePoint site.

I like Outlook for mail; but not for file management. 😉

What is Different?

Were you looking at the menu bar in each screenshot? They are not identical! Let’s take a quick look at the menu bar displayed in each tool. Of course, they could change again!

Microsoft Teams

Teams39

SharePoint Site

Teams40

OneDrive on iPhone

Teams41

OneDrive Online

Teams42

OneDrive on Computer

Teams43

Files in Outlook

Teams44

The table below summarizes what you see in the menu bar. You can quickly see that they are not the same! I’m not saying that they should be identical. I think that the menu features available are based on your context. Also, I believe that the menu features will be synchronized over time.

Microsoft Teams SharePoint Site OneDrive on iPhone OneDrive Online OneDrive on Computer Outlook
New
Upload
Get Link
Add Cloud Storage
Open in SharePoint
New
Upload
Share
Copy Link
Download
Export to Excel
Flow
Sorted by
+ (Scan, Upload, Create a folder, etc)
New
Upload
Share
Copy Link
Download
Flow
Sync
Delete
New folder
New
Upload

Review

Let’s quickly review what happened:

  1. Files can be created in Teams, SharePoint Sites, OneDrive on iPhone, OneDrive Online, and OneDrive on Computer.
  2. The files are displayed essentially the same way in each product. Teams display files in tabs within channels. Other products display files in folders. Outlook displays files in groups without tabs or folders.
  3. The menu bars are different in each product; but that may be because of the context.
  4. Viewing files in OneDrive Online may be the best for working with all of the files in a folder structure across all teams.
  5. You can sync the folders and files to your local computer.
  6. You can view the folders and files on your mobile device.

This may seem confusing with so many ways to manage files. Remember that:

  • Only Teams has conversations that you can apply to a file
  • OneDrive allows you to manage files across all Teams (and synchronize to your local computer)

Using Microsoft Teams and Conversations

In my last blog post, I wrote about Microsoft Teams and Planner. I demonstrated how you can connect to any plan in any Microsoft Team via the Planner app.

Well, let’s see review how conversations work in Microsoft Teams. I think that the main benefit is that conversations are pervasive and permanent in a Team. My personal challenge is how do I use and keep track of all the different conversations that I can have across multiple teams?

Conversation in a Team Channel

Every channel in Microsoft Teams starts with a default Conversations app and default Files app. The image below shows an example of a conversation in the Audits channel of the Contoso Finance Team.

Teams6.jpg

The first chat message is marked as IMPORTANT! It has a red exclamation mark to the right of the conversation to call it out more.

Further down, we see another chat message with a red ampersand @. That’s because Megan Bowen is mentioned in the chat. Megan is the user that I logged in as. Thus, Megan can quickly find the chat messages that need her attention.

Teams7.jpg

Conversation in a File Tab

Conversations are not limited to the app. Users can also start conversations in tabs that are displaying files. Megan wants to start a conversation with Isaiah in the Capital Improvement Proposal PowerPoint file. She clicks on the file app and clicks on Teams8 to display the conversation.

Teams9

Megan starts a conversation that can be viewed with the PowerPoint file.

Teams10

Conversation on an iPhone

Isaiah is using his iPhone and sees the new activity at the top of his feed.

Teams11

Isaiah clicks on the message to view the content. Isaiah can see Megan’s message and the meme.

Teams12

Isaiah can click on the PowerPoint and review the contents on his iPhone.

Teams13

Isaiah likes what he sees and closes the PowerPoint presentation. He enters a response and sends it.

Teams14

Megan can see Isaiah’s message in the conversation in her web browser.

Teams14

The conversation can also be viewed in the Conversations tab. Other members of the Contoso Finance team can join the conversation and post messages.

Teams16

Megan can also view her conversation history in her Activity feed. Megan can see her recent conversation from the Finance Review channel in the Contoso Finance team. She selected My Activity to display her activity in the navigation.

Teams17

Review

Let’s quickly review what happened:

  1. A conversation can start in the conversations or a file tab of a channel.
  2. Messages have special indicators when Important or a team member’s name is mentioned.
  3. The conversation messages will always appear in the conversation tab of a channel regardless of appearing in another tab.
  4. Team members can continue a conversation in a web browser and a mobile device.
  5. Conversations across channels and teams can be tracked by visiting your own Activity feed.
    • Isaiah can see his conversations on his activity feed on his mobile device.
    • Megan can see her conversations on her activity feed on her web browser.

Thus, the answer to my challenge is to use the activity feed to keep track of all the different conversations that I can have across multiple teams.